Showing posts with label bugs. Show all posts

Why to uninstall W3 Total Cache in WordPress

W3 Total Cache is an amazing cache plugin for WordPress with lots of advanced options. But for small sites on shared hostings, W3TC is overkill, and might be too complex for your needs. And even worse: if you aren't an experienced user, an error in your configuration of W3 Total Cache might slow down the performance of your WordPress based site.

That's why installing W3TC and then uninstalling it after seeing that it isn't worth in terms of performance improvements in low end hostings is not a strange practice (Hyper Cache would be much easier to install, and probably, more appropriate for novice users or just at shared WordPress hostings with limited resources.)

How to fix 404 pages after uninstalling W3 Total Cache in WordPress

A common bug experienced by several users after uninstalling W3 Total Cache is that all pretty urls in all existing WordPress posts now lead to 404 pages with not found errors.

But fortunately, this problem has a pretty easy fix. After following the basic uninstall instructions (and removing all W3TC rules in all .htaccess files) you just need to check that these lines are present in the .htaccess file at your WordPress install folder:

RewriteEngine On
RewriteBase /yourBlogBaseFolderHere/

That should go in the .htaccess file, making sure that you encode it in ANSI format, and just after these lines:

# BEGIN WordPress
<IfModule mod_rewrite.c>

And that should fix any 404 page not found error that you might be experiencing on all your pretty links of previous posts.

Other steps to uninstall W3 Total Cache

Of course, the 404 not found error for a malformed .htaccess file is just a specific bug after uninstalling W3 Total Cache. If you are considering to uninstall this cache on your WordPress blog, I'll suggest you to take a look at these other insightful articles first:

If you follow all those steps, you should have your WordPress site up and running again, with no 404 error pages or traces of W3TC at all.


Error 8001050F solved in all PS3

Finally! The in-famous error 8001050F that has prevented many PS3 gamers to play during a whole day has been solved automatically. This trophy sync error that forced many modern PS3 games on the first PS3 models to quit, was a real problem that started on 1st of March 2010 but that should be fixed now, 2nd of March 2010.

Below is the original blog post


Error 8001050F PlayStation 3

Many PlayStation 3 users have recently been welcomed by the Error 8001050F when trying to connect PSN or play any game.

Surprisingly, this error 8001050F does not happen in the new PS3 Slim, but just in the big, original PlayStation 3 models.

So the error 8001050F in PlayStation 3 is probably making most Sony engineers work agains the clock, as the error is already reported in its official website as being currently fixed.

Error 8001050F at PSN and PS3 trophies, but not at PS3 Slim

This weird PS3 error has nothing to do with the overall network connectivity of the PS3 system, because it happens even when the PlayStation has a working Internet connection. Nevertheless, the error 8001050F prevents from logging in to PlayStation Network (PSN).

But the worst part of error 8001050F is that it doesn't allow to play some PS3 games which could have some kind of DRM or trophies data sync. The PS system will display a message such as "trophy load failed - reboot system". But rebooting your PlayStation 3 won't fix the problem.

Error 8001050F is not solved rebooting PS3 or restarting games

In any case, it is important to warn PlayStation 3 users that such kind of error message about a wrong trophy data load, or trophies out of sync, won't be fixed rebooting the PlayStation system. Restarting games does not fix this this error either.

So the best course of action is to keep as they are the current saved data, as well as any other configuration data stored in the PS3 till Sony finds a patch for this error 8001050F, as well as its related PSN, trophy and game related problems.

Javascript vulnerability in Adobe Reader

A recent javascript vulnerability has been discovered in Adobe Reader and Adobe Acrobat. This public and confirmed Adobe bug would allow running malicious javascript code just by opening a PDF document. So yes, you computer could be infected by a virus or trojan if you open a PDF file using Adobe Acrobat or Reader.

The bad news are that this malicious javascript code is hard to detect inside a PDF file, so most antivirus software won't be able to prevent the exploit by scanning PDF files. On top of that, Adobe won't be releasing a patch for this bug till January 2010, so the PDF readers would be vulnerable to exploits and so on.

But there are still good news: just disable JavaScript in Adobe Reader to prevent this exploit. That simple trick will keep your computer safe from virus and malware in PDF files.

How to disable javascript in Adobe Reader

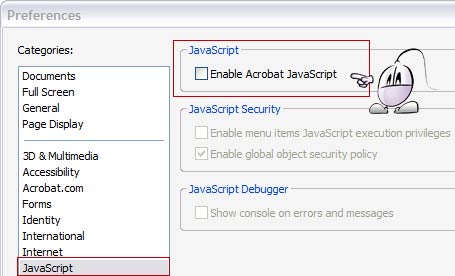
Disabling Javascript in Adobe Reader and Adobe Acrobat is very simple. Just select the Edit > Preferences menu, and click the JavaScript option. Then just uncheck the Enable Acrobat Javascript box at the top.

Disable Javascript in Adobe Reader

And that's it: unchecking this option as in the image above will prevent the malicious Javascript code from exploiting this recent vulnerability of Adobe Reader.

It seems that there is a recent problem with SWFObject in Firefox: SWFObject does not load Flash, and it just keeps displaying the alternative content for browsers without Flash enabled. Upgrading Flash player does not solve this Firefox specific problem.

The ironic part is that it seems that the source code of SWFObject has not been changed recently. So this bug is related with Firefox, and most probably, with a corrupted automatic Flash Player update that conflicts with SWFObject just in Firefox. A normal reinstallation of the latest Flash Player does not seem to solve the problem.

One way to solve specific SWF Object problems in Firefox is disabling the automatic hiding of the alternate content till the Flash content is fully loaded. This bug has been reported for Firefox 3.5 and is solved just by adding swfobject.switchOffAutoHideShow() in the SWFObject code.

Another thing to check is adding all the Javascript code for SWFObject inside the document head. Placing the code for initialization inside the document body seems to make SWFObject stop working in Firefox.

If all the previous fixes fail, the only way to solve this SWFObject problem in Firefox thus far would be reverting to a very old SWFObject version. Both SWFObject 2.1 and the recent SWFObject 2.2 versions seem to be experiencing this problem in Firefox, but versions from when SWFObject was still called FlashObject seem to work fine.

If this problem is not solved quickly it would be better to remove SWFObject from the webpage, or probably several Firefox users won't be accessing the Flash content. The latest posts on this bug tracking thread seem to be closely related to this bug. Let's keep an eye on it till the fix is found.

Fallout 3 crashes when loading interiors

If you have a multi-core CPU, like the Quad, and you experience a Fallout 3 crash when loading interiors (the PC version of Fallout 3, specially in closed spaces). It seems that this crash is caused by a bug in Fallout which doesn't adapt multi-threading well, and this PC game stops responding in small areas.

Fallout 3 crash fix

The fix for this Fallout 3 bug is very easy: just copy and paste and you are ready to go:

  • Open the folder My documents / My Games / Fallout3
  • Edit the file FALLOUT.ini.
  • Inside FALLOUT.ini look for a group called [general].
  • Inside the general group, after all the configuration parameters, just copy and paste the following 2 lines:

bUseThreadedAI=1
iNumHWThreads=2

Now close and save the Fallout 3 configuration file.

And that's it: you should have fixed the Fallout 3 crash when loading small closed interior areas. Well, Fallout 3 could stop responding sometimes, but these crashes won't be a frequent bug in Fallout.

Source

If you liked Fallout 3, you may like:


XAMPP MySQL deactivated error

Installing XAMPP is a quick way to setup an Apache Server with PHP and a MySQL database.

But sometimes there's some kind of configuration error or bug that doesn't allow to start the MySQL service. Checking the status with the XAMPP control panel will display a message of "MySQL database DEACTIVATED".

How to fix the XAMPP MySQL deactivated bug

While I'm not sure about the causes of this error, there is a quick fix to activate MySQL in XAMPP following 2 simple steps.

  • First, try not to configure your MySQL database as a service. This is asked during the XAMPP installation. So don't select the checkbox of installing MySQL databases as a system service.
  • Second, create a basic configuration file for your new MySQL installation (you can do this automatically using Win MySQL admin).

Yes, there's an automated way to generate a basic config file for MySQL using tools installed by default in XAMPP. Just go to [XAMPP installation folder] / mysql / bin and run winmysqladmin.exe. Type a new username and password, and let the MySQL admin program generate the default mysql initialization file.

And that's it! A MySQL disabled as a Windows service, and a default configuration file with MySQL username and password defined should change your XAMPP SQL status from "MySQL database deactivated" to MySQL database ACTIVATED.

How to check that MySQL status is active

You can check the status of the MySQL databases opening the XAMPP control panel: MySQL should have a green running tag next to it.

Notice that I wouldn't keep using the Win MySQL Admin once you turned your MySQL service active: it's an old, discontinued application that seems to throw random Windows errors. But don't worry: just close the Win MySQL Admin window and keep using the built-in phpMyAdmin from the XAMPP default installation.

You can open the phpMyAdmin menu to check the active status of the MySQL databases from the XAMPP Apache main menu: start the Apache server, open the main server page using your web browser (just type "localhost" by default in your web browser address bar) and click the phpMyAdmin link to check that your MySQL databases are enabled.

I hope this helped you to activate your MySQL databases in XAMPP! Now, have a happy coding and local server testing!