Showing posts with label Windows. Show all posts

Backup user passwords for Windows users in USB

A little known feature in Windows is that you can creat a password recovery USB.

Creating that recovery USB is pretty easy: just log in as a Windows system administrator. In Windows control panel pick the option User accounts.

Select the Windows user for whom you want to create the USB for password recovery. Among the options of this user, in the left area, under the Related tasks area, there is an option about Preventing to forget passwords.

When clicking that password forget prevention fature, a new dialog will appear to pick a password recovery disc in an USB key. (Well, you could use even a diskette for password recovery, but it isn't worth in these times...).

By selecting that option, the recovery passwords will be stored in the root of the USB as an encrypted text file. This safe file stores Windows passwords in a safe way, and it can only be accessed in the same Windows computer in which it was created (if no other password recovery USB is created using this same method).

So this is a way to create an USB for each user, as a system to recover Windows user passwords for each user.

How to store many Windows password recovery files in the same USB

Since the password recovery file created always has the same filename (it is called userkey.psw), you will need a different USB key for each user, in each Windows computer.

To solve this and have several user passwords stored in a single backup USB, you just need to rename the password file created (for example, to user0001.psw) and so on with the next password files that we create. Remember to organize them in a meaningful way to prevent forgetting the user and Windows associated to each password backup file.

After this, to recover Windows user passwords you just need to rename the proper backup file in your USB to userkey.psw, and using the USB key with such standard filename in its root.

---

Originally written by Eugenio M.S. at tatachan.com

Say "No to all" in Windows XP

When copying lots of files, maybe you have missed having a button like the "Yes to all" version, which copies and overwrites everything. Maybe you wanted to say "No to all" when you only wanted to add the new files (without overwriting old files), and without having to click a lot of times during a massive copy of files.

Even when such "No to all" button doesn't exist, there is a way to avoid such overwhelming amount of clicks:

Inside such Windows dialog, when you press the n key, it is equivalent to clicking the no button. We have just to keep pressed the n key during the copy. Having this key pressed during the copy is equivalent to clicking the "No" button in all the confirmation dialogs that appear. But you won't need to point and click on any button. That way, we won't have to maim our poor mouse by clicking it again and again.

From an original post by Dremin.

How to kill Windows process automatically with a .BAT file

One of the easiest ways to speed up Windows is closing unnecessary taks and processes. That's why sometimes we want to kill many Windows programs / processes, but we do not want to disable neither manually nor forever. It could be a group of programs that we rarely use, but which require some system process running permanently. So when we turn on the computer with other task in mind, we don't want these unneeded processes consuming Windows resources continuously.

That's why we are going to create a batch file (.BAT) which with a double click on it will kill as many Windows processes as we want.

So let's open Windows Notepad (Shortcuts: "Start Menu / Run / Notepad" or "Windows Key + R / Notepad") and then typing:

TASKKILL /IM "process name" /F

Example:

TASKKILL /IM MSPAINT.EXE /F

"IM" lets us input the name of the Windows process to kill, and "/F" enforces such process closing action and kills them forcefully preventing confirmation prompts or hanged.

If we want to specify a group of programs to close, we should only repeat the previous line of code with each process name, inside the same file.

Example file:

TASKKILL /IM MSPAINT.EXE /F TASKKILL /IM NOTEPAD.EXE /F TASKKILL /IM CALC.EXE /F

Once this file is ready, we should keep it using File / Save as...

And after the name chosen for this file we should appen the .bat file extension. That's how we create a Batman file... well, no, a .BAT file (batch process).

To save a .bat file using notepad we have to change the file type, which is by default Text Files (*.txt), choosing All Files. This is very important. Otherwise, we would just creating a text document called "whatever.bat".txt, and that won't work.

Let's also pick the ANSI encoding type for this process kill bat file.

And finally, we click on the save button to store the file.

How to save a bat file

By default, this creates a file with an icon like this icon, depending on your own system icon configuration set.

Now, whenever we want to close every Windows process specified in the file, we only need to double click that file, and it will perform the automatic process killing for us.

Running a .BAT file is like running the Windows command prompt code to close all the processes, but these batch files perform all the necessary actions automatically, in no time.

We can also check a complete and detailed list of the values and parameters that we could add after "TASKKILL" just clicking in Start / Run (Windows + R), typing cmd (to run the Windows command prompt), and typing at this window: TASKKILL/?.

Running processes with .BAT

If we want to reopen every Windows process previously killed with our .BAT file, with no need to reboot Windows, we can automatically perform the reverse operation, creating another .BAT (same process as before) this way:

START "Name" "C:\...path.exe" START "Name" "C:\...path.exe" START "Name" "C:\...path.exe"

To specify the full path of the target program we can only use ASCII text, with no accents or other special characters.

Example:

START "Paint" "C:\WINDOWS\System32\mspaint.exe" START "Notepad" "C:\WINDOWS\notepad.exe" START "Calculadora" "C:\WINDOWS\System32\calc.exe"

NOTE: This trick to run or kill Windows process also works to create a .BAT file to automatically open our most used apps (using the "START" Windows command), and another .BAT to kill these programs (the TASKKILL command file).

4Gb RAM in XP: how to increase maximum XP RAM limit

By default, Windows XP maximum RAM amount is 2Gb. This operative system won't use more memory even with more RAM memory available already installed on the motherboard of our PC.

But there are some tricks to avoid this XP RAM limit, and make Windows XP use even 3Gb and even 4Gb of RAM when running some applications.

How to use 3Gb: increase Windows XP RAM limit

Let's open the BOOT.INI file. It is possible that this file could remain as a hidden file in some Windows XP versions, even after enabling the Windows "display hidden files" option. But to open this file you just need to type C:\boot.ini in the address bar of the Windows XP File Explorer.

Then let's find the following line of code inside such Windows configuration file:

[operating systems]
multi disk rdisk(7)partition(3)\WINDOWS="Microsoft Windows XP Professional" /fastdetect

After /fastdetect let's type a blank space and then /3GB.

The resulting Windows configuration line would be as follows:

[operating systems]
multi disk rdisk(7)partition(3)\WINDOWS="Microsoft Windows XP Professional" /fastdetect /3GB

Reading 4 Gb RAM in Windows XP

To reach the Windows XP maximum RAM amount of 4Gb we have to add this configuration option to the previous Windows code: /PAE just before /3GB. The configuration file for the maximum RAM limit in XP would be as follows:

[operating systems]
multi disk rdisk(7)partition(3)\WINDOWS="Microsoft Windows XP Professional" /fastdetect /PAE /3GB

This enables the PAE mode and Windows XP would use 4Gb RAM, but only with software that supports this Windows PAE mode.

Real time webpage comparison in different Explorer Versions

With the recent release of Internet Explorer 8, Microsoft has added some subtle changes about how the HTML web pages are rendered. So the new challenge is: how to upgrade web pages that work in the old IE 6 to work in the newer Explorer 7 and 8 versions?

Fortunately, Microsoft has released a new tool to help migrating websites optimized for Internet Explorer 6 to the new Explorer 7 and 8: Expression Web SuperPreview.

Super Preview allows real time webpage comparison of the HTML rendering using different Explorer versions. Both webpages are simultaneously displayed, overlapping the output of each Explorer window, so you can detect (and correct) even the most subtle difference of Internet Explorer!

What's the number of IE 8 users?

Did you wonder how is Internet Explorer 8 doing? You can take a look at the real time market share of IE 8 since the new version of the web browser was released.

It's interesting that there was an usage drop of IE 8 with users going back to Explorer 7. But with the so called compatibility view button (which renders a webpage in IE 8 like the previous IE 7 would do) there shouldn't be any problem at all. More info about this here.

And now, the number of Internet Explorer 8 users continues growing steadily.

Sevenup: say no to the old Internet Explorer versions

If you ask me about what web browser to choose, I would suggest you to install Firefox because its customization capabilities and ease of use, or Chrome because it's really fast loading webpages.

But I'll have to admit that Microsoft Internet Explorer has been improved a lot in its latest releases (mainly because its interface was a copy of inspired by the graphic interface of Firefox). And now we are very close to the improved Internet Explorer 8 release.

There's an interesting open source javascript project that encourages users to upgrade user versions to Explorer version 7 an higher: Sevenup. Add this simple line of javascript and then you can even require the upgrade to access your webpages, or leave it just as a suggestion for outdated users.

Another similar project is the IE6 Upgrade Warning which also features translated warning messages and a carefully designed layout to encourage users about updating their web browsers.

It seems like a good initiative for a safer web browsing (and to reduce the headaches of website designers).

Monitor, hide and permanently remove systray icons and processes

Some of the programs that we install add new system processes. These processes always consume system resources, but are often unecessary. Other programs also add new "Systray" icons (Systray is the Windows System Tray, in the lower right corner of your Task Bar, next to the clock). And some of these systray icons may not be removed by a simple right click / close option. Even if you closed a systray icon, it wouldn't be removed, and it would be restored when booting again your PC.

We can optimize the memory usage of our PC killing several system processes and system tray icons.

Nevertheless, our best first choice to permanently remove Systray icons is to double click the icon, or right click / properties on such icon, and look for options to uncheck the "Show icon on the system tray", "Display quick link icon" and so on.

Checking Windows processes

To display the active processes in Windows: Right click the task bar / Task manager, or press simultaneously Control+Alt+Del.

The tab called "Applications" is the listing of the currently open programs, which are usually displayed in the left part of the Windows task bar.

The tab named "Processes" (this is the most useful one) are the currently running system processes, no matter whether they are visible or invisible. We can check how much system memory are using these processes on the right column.

We can temporarily kill these processes (till we reboot the PC) by simply selecting them and clicking "Terminate process". There are some processes that are essential for Windows while others can be safely shutdown. To find out what does each process, you can find out detailed process information (manufacturer, software, possibilities of being a virus or spyware, function, whether it is a mandatory process or not, user comments, etc.) at liutilities.com.

Remove systray icons and processes permanently in Windows

There are several ways to permanently remove system tray icons and system processes (which don't provide a permanent removal option by default), and to prevent them from running again when rebooting the system.

An easy way is to install the free registry cleaner program called Regcleaner. Run the program and in the "Startup List" tab, select and delete the undesired processes.

This way to remove system tray icons and processes does nearly the same (plus a system process backup) as the following way (in which you don't have to install anything), which consists of clicking Start menu / run and then typing msconfig. This will open the System configuration utility. In the "Startup" tab of such menu we have a complete listing of the Windows processes. We should just uncheck the undesired processed, and we are ready to go.

Side note: removing Windows startup processes this way will make the following warning message appear when rebooting the system. It's just Windows information about the user-initiated removal of processes ran at startup.

Just uncheck the "Don't show this warning again..." and click Accept.

How to unlock Windows if you blocked your PC with "Windows + L"

Unlocking Windows

Have you accidentally locked your Windows PC (maybe trying some keyboard shortcuts such as "Windows + L") and don't know what to do?

If you pressed "Windows key + L" to lock your PC, a password prompt will be shown for your current Windows user. The straightforward way to unlock your PC is to input your current Windows username and password. Entering the login data from another user with Windows admin permissions will disable the Windows lock too.

But, if you activated this Windows keyboard lock by accident, and you don't remember having specified any password related to your current user, don't panic! If you never defined a password for your active Windows user, just leave the password field empty and click "Accept": that will unlock Windows for sure.

Minimizing windows, showing your Windows Desktop and restoring windows fast

Restore windows fast

In the following lines I will explain you the fastest way to open a new Windows application from a desktop shortcut: using some of the Windows key shortcuts you won't waste time minimizing and maximizing windows one by one.

The Windows keyboard shortcut "Windows + D" will minimize all of your open windows, allowing you to access the shortcut icons on your desktop. Pressing "Windows + D" acts like a window visibility toggle, and will restore the layout of your previously open windows. Nevertheless, this won't work if you click any of your desktop shortcuts (that is, if you open any new window). In such situation, your minimized windows won't be restored by a new key press of the "Windows + D" shortcut. So this is an useful shortcut, but it isn't the quickest way.

On the other hand, there are a couple of Windows keyboard shortcuts that will allow you to view all your desktop shortcuts, open a new Windows application, and then restore the size and position of all your previously open windows.

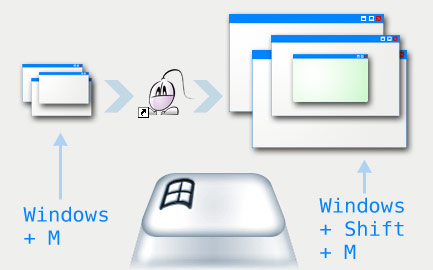
The minimize keyboard shortcut "Windows + M" doesn't work like a window visibility toggle: you won't be able to restore the position of your windows by clicking "Windows + M" again. But the advantage of using this shortcut is that you can restore the size and position of your windows by pressing the Windows maximize keyboard shortcut "Windows + Shift + M".

So the typical scenario to quickly open a new Windows application using shortcut keys is as follows:

  • Press first the "Windows Key + M" shortcut to minimize all your open Windows.
  • Any shortcut icon on your desktop will be visible now. Click any shortcut to open a new window.
  • Finally, restore the visibility of your previous windows maximizing them again, thanks to the "Windows Key + Shift + M" shortcut.

Windows Key Shortcut List

Windows key shortcuts

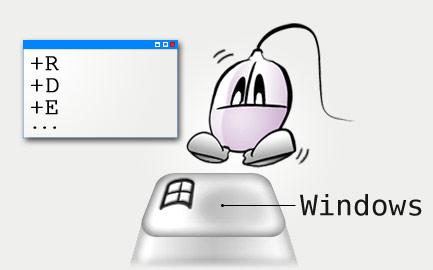
Did you know that the Windows Key on your keyboard has more functions than just showing your Windows Start menu? It can be pressed in combination with other keys, accessing this way some useful and time-saving default Windows keyboard shortcuts.

  • Windows Key + E = (Explorer) open Windows file explorer (such as clicking on "My Pc" button, with the directory tree open in the left pane).
  • Windows Key + M = (Minimize) minimizes all your open windows.
  • Windows Key + SHIFT + M = (Maximize) restores the size of all your application windows.
  • Windows Key + R = (Run) open Windows "Run" program window.
  • Windows Key + D = (Desktop) show Windows Desktop.
  • Windows Key + F = (Find) open Windows search menu.
  • Windows Key + L = (Lock) blocks your PC.
  • Windows Key + U = (Utility) open Windows Utility manager (such as accessibility utilities).

Remember that all these keyboard shortcuts are enabled on any Windows PC by default. In fact, they are an easy way to save time when accessing common Windows functions.

Interrupt Windows Shutdown

Interrupting Windows shutdown

Did you know that it is possible to interrupt Windows shutdown? Imagine that you accidentally clicked your shutdown button, and you need to stop this process and continue working with Windows. Well, this simple trick could save you some long Windows reboot sequence.

There is a Windows shutdown.exe command option that will stop any undergoing shutdown process. You just need to run the following command:

shutdown.exe -a

Of course, you should be very quick to type this command before the shutdown process is completed (it will work as long as your keyboard remains responsive during the shutdown process). In practice, that would be impossible. So your best option is to create a desktop or a keyboard shortcut to interrupt the Windows shutdown sequence, as we did with the fast Windows shutdown.

Notice that you won't be able to interrupt a Windows shutdown timer: you can just stop a standard, user-initiated Windows shutdown. If a computer virus kills any of your main Windows processes (such as Sasser virus did with lsass.exe), that would start a Windows shutdown countdown that cannot be interrupted. So the main utility of the interrupt Windows shutdown parameter is to prevent a situation of: "Oops! I didn't want to exit Windows yet!".

A trick for super-fast shutdown: Windows turned off at once

Super fast shutdown

Have you ever wanted to perform a super-fast shutdown on your Windows PC? Imagine that you could shutdown Windows just by clicking on a desktop icon, or using a keyboard shortcut. So you could just run the shutdown process, turn off your monitor, and continue with another important task - without having to wait till your PC is completely turned off. Well, that's possible thanks to the Windows shutdown command plus the appropriate shutdown parameters.

Windows Shutdown Command

Windows provides a shutdown command (named shutdown.exe) which could be used to turn off your PC from the Windows command line. Calling this shutdown function with the appropriate parameters will start a super-fast shutdown process that won't be interrupted. The only line of code needed to shutdown Windows is as follows:

shutdown.exe -s -f -t 00

This is the explanation of the shutdown parameters:

  • -s starts the Windows shutdown process in order to turn off your PC.
  • -f forces exiting any running Windows process, without any warning: no blocked application will interrupt the shutdown process.
  • -t 00 specifies that the shutdown process is delayed 0 seconds: Windows will be shutdown immediately.

That will quickly shutdown windows, exiting at once any program. So the shutdown process won't be stopped by any unresponsive application: with these parameters you will override any annoying "finish program not responding" Windows prompts. Just run the shutdown command and leave your PC.

On the other hand, if you still have some unsaved changes on any application, it seems that you will be given one last chance to save your progress, thanks to a "save changes?" Windows prompt. You can start this super fast shutdown process without fearing to lose any application data.

How to create a quick Windows shutdown button

Let's save even more time creating a quick Windows shutdown button. Don't type by hand the whole shutdown.exe command with those parameters: store the shutdown command line in a batch file following these 2 simple steps:

  • Open your favourite text editor and paste the Windows shutdown code inside: shutdown.exe -s -f -t 00
  • Save this file as a ".bat" file (for example, fast-shutdown.bat)

You have just created a super fast shutdown button: now you can quickly shutdown Windows just by double clicking your shutdown ".bat" file!

A keyboard shortcut to quickly shutdown Windows

Can you imagine an even faster whay to shutdown Windows? Well, there's still a quicker way to start this unstoppable, lightning-fast shutdown process: you could turn off your PC using a keyboard shortcut.

Once you have created a .bat file that contains the shutdown.exe command with the appropriate parameters, associating this file with a keyboard shortcut is very easy:

  • Right click your .bat file and create a shortcut
  • I always place this shortcut icon on my desktop, so I can quickly shutdown Windows with a double click
  • Right click the recently created shortcut icon and select Properties
  • Inside the shortcut tab, click on the keyboard shortcut field
  • Press the keyboard shortcut that you would like to use to shutdown Windows. (As you don't want to accidentally shutdown Windows, select some complex combination that would be unused by most applications, such as CONTROL + ALT + SHIFT + F12)

And that's it! You have learnt how to perform a super fast Windows shutdown process through a keyboard shortcut. Run this command to quickly turn off your PC, leave at once (don't worry about closing running applications, because Windows shutdown will force the exit), and save your valuable time!